Part 6 | SOC Analyst Home Labs

Part 6: Automated Yara Scanning
In this part of the lab we'll use LimaCharlie to automatically scan for the presence of malware based on YARA signatures.
About YARA
YARA is a tool primarily used for identifying and classifying malware based on textual or binary patterns. It is used to craft rules that describe characteristics of known malware and variations as well as malicious behaviors.Add a YARA signature for the Sliver C2 payload
-
Onto LimaCharlie's Web Interface, browse to "YARA Rules" under "Automation" on the left-side panel.
"Automation" > "YARA Rules"
- If you have "YARA Service" in your menu instead of "YARA Rules", go to 1 - a of Part 6: So you want to be a SOC Analyst? where a detailed fix is written by Eric Capuano, the creator of this lab series.
- Go to "Automation" > "YARA Rules" and click on "Add Yara Rule". Name the rule "Sliver", copy and paste the gist of the Rule Block, and click "Save Rule".
-
Before we leave this menu, we'll create another YARA rule that we'll use for a later part of the lab.
- Name the rule sliver-process
-
Copy and paste this gist into the Rule block.
-
Next we need to setup a few D&R rules that will generate alerts whenever a YARA detection occurs.
- Go to "Automation" > "D&R Rules"
- Create a new rule
-
# In the Detect block, paste the following lines.
event: YARA_DETECTION op: and rules: - not: true op: exists path: event/PROCESS/* - op: exists path: event/RULE_NAME -
# Paste the following lines in the Respond block
- action: report name: YARA Detection {{ .event.RULE_NAME }} - action: add tag tag: yara_detection ttl: 80000 - Save the rule and name it "YARA Detection"
-
Create another rule
-
# Paste the following lines in the Detect block
event: YARA_DETECTION op: and rules: - op: exists path: event/RULE_NAME - op: exists path: event/PROCESS/*
-
# Paste the following lines in the Respond block
- action: report name: YARA Detection in Memory {{ .event.RULE_NAME }} - action: add tag tag: yara_detection_memory ttl: 80000 - Save the rule as "YARA Detection in Memory"
-
# Paste the following lines in the Detect block
Testing the new YARA signatures
- In LimaCharlie, go to "Sensors List" > "Windows VM sensor"
- Click on the "Console" option from the left-side panel. This allows us to run sensor commands against this endpoint
-
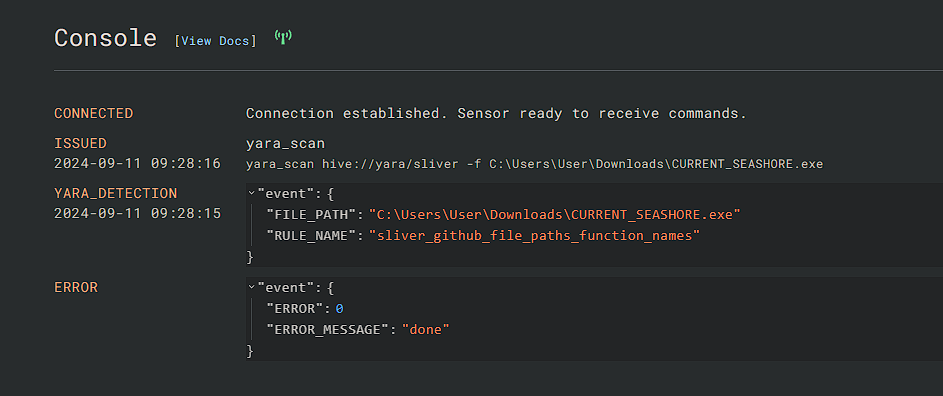
# Run the following command to start a manual YARA scan of the Sliver payload.
yara_scan hive://yara/sliver -f C:\Users\User\Downloads\[payload_name].exe
If the rules are setup correctly so far, we should get the following results. If there's an error while running the scan, delete the YARA and D&R rules and re-create them then try again.
-
Confirm we have a new Detection on the "Detections" screen

Automatically YARA Scan Downloaded .exe files
- Go to: "Automation" > "D&R Rules"
-
# In the Detect block paste the following
event: NEW_DOCUMENT op: and rules: - op: starts with path: event/FILE_PATH value: C:\Users\ - op: contains path: event/FILE_PATH value: \Downloads\ - op: ends with path: event/FILE_PATH value: .exe -
# In the Respond block, paste the following
- action: report name: EXE dropped in Downloads directory - action: task command: >- yara_scan hive://yara/sliver -f "{{ .event.FILE_PATH }}" investigation: Yara Scan Exe suppression: is_global: false keys: - '{{ .event.FILE_PATH }}' - Yara Scan Exe max_count: 1 period: 1m
The response will generate an alert for the .exe creation. Additionally, it will start a YARA Scan using the Sliver signature against the newly created .exe - Save the rule as "YARA Scan Downloaded exe"
Automatically YARA Scan Processes Launched from Downloads Directory
- Go to: "Automation" > "D&R Rules"
-
Create a new rule
-
# In the Detect block, paste the following
event: NEW_PROCESS op: and rules: - op: starts with path: event/FILE_PATH value: C:\Users\ - op: contains path: event/FILE_PATH value: \Downloads\
This rule is matching any process launched from a user's Download directory -
# In the Respond block, paste the following
- action: report name: Execution from Downloads directory - action: task command: yara_scan hive://yara/sliver-process --pid "{{ .event.PROCESS_ID }}" investigation: Yara Scan Process suppression: is_global: false keys: - '{{ .event.PROCESS_ID }}' - Yara Scan Process max_count: 1 period: 1m
-
# In the Detect block, paste the following
- Save the rule as "YARA Scan Process Launched from Downloads"
Triggering the new rules
-
Instead of redownloading the C2 exe we can simply move it back and forth in the Downloads directory
-
# Run the following commands from a PowerShell to move the C2 file. Replace the {payload_name} with the actual payload name we generated earlier.
Move-Item -Path C:\Users\User\Downloads\{payload_name}.exe -Destination C:\Users\User\Documents\{payload_name}.exe -
# Move back the C2 exe into the Downloads directory
Move-Item -Path C:\Users\User\Documents\{payload_name}.exe -Destination C:\Users\User\Downloads\{payload_name}.exe
-
# Run the following commands from a PowerShell to move the C2 file. Replace the {payload_name} with the actual payload name we generated earlier.
-
Go to Detections tab and find the newly created detection

Triggering the new rules
-
# Run this command from an Administrative Powershell to kill any existing instances of the Sliver C2 from previous parts of the lab. (replace {paylad_name} with the actual C2 payload name)
Get-Process {payload_name} | Stop-Process -
# Execute the sliver payload to create the NEW_PROCESS event to trigger the scanning of a process launched from the Downloads directory
C:\Users\User\Downloads\{payload_name}.exe -
Check the Detections tab to see the newly created event.

There are the newly created alerts for the "Execution from Downloads", the automatic scan that was triggered by that, and the .exe file that was found.
Resources:
So you want to be a SOC Analyst? Part 6